Showing posts with label DIY. Show all posts

Gallery Wall Pt. 1


It's no secret to my friends and insta followers that I'm slightly obsessed with decorating and redecorating and creating an enjoyable space to look at. I've had this idea of a gallery wall brewing in my mind for about 8 months now but I've never had a space for said gallery wall.  Well, Jeff and I moved last month and our new home has the absolute perfect spot right above our couch! I'm still putting together the whole look of the wall and gathering prints and creative personal touches to make it just right. So here's a little sneak peek at what I've mustered up so far!
I've been scouring Etsy and my home for meaningful art to put on our walls. I've tried to get creative with the elements of the wall, including things that both Jeff and I love. I'm a big reader so I've incorporated torn book pages, post cards and letters, and a book cover that I'm kind of obsessed with [pictured above :)]. Jeff loves to go fishing so I'm working on including some fishing elements, so that the wall represents BOTh of us :) I'm still working on putting it all together and finding just the right images so you'll have to check back and see the final product in the coming days!

Any suggestions for more unique prints I can put up? Do you have a gallery wall? I'd love to see it!


plate wall

Back when I was first introduced to Pinterest I came across the idea of a plate wall. However, I never understood how to hang plates on the wall, so I didn't pursue the idea. How silly of me! Ever heard of a plate hanger? Super novel idea. They exist and they are less than $2 from any craft store. I found mine at both Hobby Lobby and Michaels. 

I started my collection over the summer, my first few plates came from the thrift store. You can see those here. Over time I went into West Elm, World Market, and Anthropologie looking for discount plates, and I was really surprised to find some of these super cute plates for less than $6! I'll give you my source list below. 

The best part of this wall is that it's always changing. This is my current setup, and the one I've liked most. I've had plates rotating in and out with the seasons though, and it's a lot of fun to change it up..yet maintain a similar design scheme. 

yes, that IS boy meets world on my tv :) and yes I know my plate wall isn't currently centered...but it's a work in progress, I left room for new additions.


source list : 


>>>

Have you checked out my succulent DIY yet? I just love the color here so I had to share it again :)


DIY Anthro Succulent Mug


Succulents are seriously my new favorite thing you guys. You can put them anywhere and they're so easy to manage. I've seen creative succulent pots/mugs/cups all over Pinterest, West Elm, and Anthro lately and thought it would be fun to make my own..instead of buying the expensive kits they create for you. I mean West Elm is charging upwards of EIGHT DOLLARS for just your succulents...love you WE, but you can find these little guys from Lowes for $2. 

It's almost silly to give you guys a DIY for this because it's SO simple. But it's fun and I want you to make them too, so I'll give you the 411.

What you'll need

cute mugs [I got mine from anthropologie]
soil
succulents [from lowes or home depot]
OR
take clippings from mom/grandma/succulents you already have
stick them in water until they begin to root

Process

Fill cup almost full with soil, separate soil with your fingers and stick in succulent. 
THE END!
So easy, right? 

These would be cute on top of stacked books on your bookshelf, next to your kitchen sink, clustered on your bedroom dresser...or just about anywhere. I gave these pretties to my friend, {they made the cut for her mantle makeover!..which you can check out by clicking that link} so I'll be making another Anthro trip in the near future to make some for myself!


day in the city | blogger date


Last weekend I met up with one of my favorite designers/bloggers, Michaela, in the city! We had been trying to get together for almost a year now and our schedules never matched up until just recently. She is such a stylish, fun girl and I'm so thankful we've been able to form a friendship through blogging. How cool is that? It was so great to finally hang out and spend the day together!

We started out at the Flower Mart where we pieced together a beautiful bouquet. You can find all the details to that DIY here on Michaela's blog! It was the coolest place..literally a warehouse full of gorgeous buckets of flowers. It's pretty much a farmer's market for just flowers. You can't go wrong with that!


Then we went a little picture crazy to make sure we captured the prettiness of our bouquet :D

yes i'm fully aware the right side of my hair is having a friz crisis...let's just move past it and blame the bay area weather :) 

AND can I just say I would LOVE to come back to the Flower Mart for a full-on photo shoot. Please, someone take me up on this offer? I promise your pictures will be colorful, and pretty :) 

After the Flower Mart we spent some time shopping around the city and just chatting. It was a great day and I can't wait til we can meet up again! Don't forget to go say hello to her and check out her DIY bouquet post HERE

:)


DIY Button Earrings


I'm still alive! Over 3 weeks since my last post? Yikes. I've kinda just fallen off the blogging train I think, lost a little inspiration I guess you could say. So why not make my reappearance with a DIY? Hopefully this will be the start to new inspiration. I just enjoyed Spring Break and had some time to do a little crafting with my best friend but now it's back to the books. It's about to get crazy intense with school...but I just peeked at the countdown widget on my dashboard and we're at 53 days 10 hours 37 minutes and 57 seconds until graduation, to be exact ;). Just a little over two months until freedom. I can hardly believe it.

Happy crafting and happy Monday!


New additions and crafts

Before school started, we made a few changes around the apartment. It's so hard finding nice furniture for such a small space, but with places like Ikea and World Market, our job is made easier! Besides some new furniture, I got in a few crafts before the crazy school semester started.

I've really been wanting some new coasters lately because the ones we had didn't really match the themes we had going in our little place.  I stumbled on this idea from Pinterest one day and decided I had to give it a try. I used the coasters that we already had because I didn't want them to go to waist. I'm so happy with the outcome and only burned myself with hot glue 5 or....20 times :)


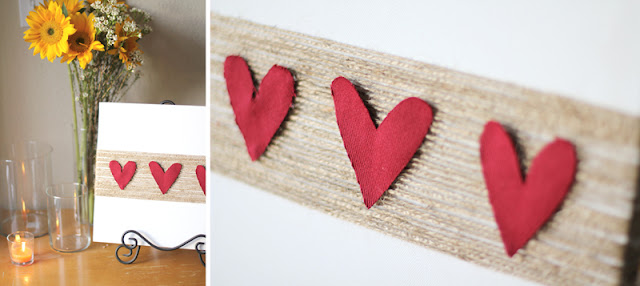
The next craft I worked on involved some more hemp because I'm sort of obsessed with it right now. But, sticking with the theme of saving money I looked around the house for more supplies on hand. I found a canvas I bought on clearance last year, and had saved for the perfect craft. All I did was wrap the hemp around the canvas, as tight as it could go. After spacing it out evenly..because I'm slightly OCD..I cut out hearts from some fabric I had and hot glued it on top. Easy peasy lemon squeazy.


I'll show some before and after pictures of our living room in another post so you can all see the transformation, but for now I'll reveal our new Ikea chair. The lady I used to nanny for had it sitting in her garage and offered it to us a few months back. We had ugly brown couches before and no space for it but I assured her we would be back for her green beauty. When Mr got home...literally THE night he got home from Iraq, we went out and bought new couches. We couldn't put up with our dirty brown Craigslist couches much longer ;) So after Christmas passed and we had room where our Christmas tree was..we called up our friend and said we were coming for the chair. I'm in love with it, and feel like it finished off our room perfectly. So here's a little sneak peek of our new family room. Oh, and the best part, now we have an ottoman..

I've always wanted an ottoman...is that weird?


So there you have it...all our little home changes on a budget. I've got so many more projects I'm dying to do but I should probably write that 8 page paper first... ;)

Happy crafting and decorating!


thrift store redo

Found this cutie patootie at a local thrift store..


and turned it into THIS!


dresser: $10
world market knobs: FREE with world market coupon
spray paint: $5


I'm super happy with the outcome and can't wait to add this to my room.
Mr, don't you love the yellow? I told you to have faith in me :)


DIY laundry detergent

I've seen this all over Pinterest and was just waiting until I ran out of regular detergent before I ventured into the land of true domestic wife. This stuff is ridiculously cheap and easy to do. All items can be found at your local grocery store on the laundry aisle.

You will need a box of Borax, Arm & Hammer super washing soda, and fels-naptha soap. I've also seen that Zote soap from Home Depot works well too. For the final product I dumped everything into a mason jar I already had, then went to the dollar tree and found these coffee scoops!

I took this picture after I was finished, hence no picture of the fels naptha, but click here to see what it looks like.


So the worst part of this was the 30 minute soap grating process. Maybe I just have a terrible cheese grater, but regardless of the time it took, I'm convinced it's worth it in the end!


Grate down the whole bar then add 1 cup of Borax and 1 cup of Washing Soda


Mix it around thoroughly and then dump into your favorite jar.


Breakdown:
Arm & Hammer Washing Soda: $3.99
Borax: $4.79
Fels-Naptha Soap: $1.27
$10 for everything. Cheap, cheap!
(Optional Coffee Scoops: $1)

Each load takes only one tablespoon, a tablespoon people! Which means this mixture will last 60+ loads which is double the amount of any detergent I used to buy. Oh wait..there's more..the Borax and Arm & Hammer boxes are enormous and I probably won't have to buy new ones for like 5 years. Borax can also be used for almost any of your household cleaning needs. So have I convinced you yet? Go make your own detergent!

Bathroom Re-Vamp

Best friend and I are impulse crafters. We live and love to plan our crafts, but sometimes the moment strikes, and it has to be done that night. Sometime before school and work kicked in, we found time to hang out. Best friend mentioned that her bathroom needed a redo and she had a couple things in mind. With a quick trip to the 99cent store and Walmart, we transformed her bathroom to a little bit of elegance :)


The mason jar soap dispenser was one of my favorite touches.


We took 99cent store vases and hot glued them onto candlestick holders, tea light holders, and smaller vases to elevate and add contrast!


Fourth of July Inspiration and DIY


If I was throwing a fourth of July party and had my own home
these are a few of the things I would do and make!
I'm so excited for the day I can do all of this, but until then I'll google..pin..and dream.
sigh..


 all images above via


Since my husband's in the Army, I figured I'd go all out in decorating
our little place with patriotic stuff this time of year. But time got away from me and it's almost the fourth already. 
I haven't had the motivation I thought would be there
but here's a little smidge of patriotic popping up in my house so far. I plan to shop til I drop at JoAnn's tomorrow since there's some crazy amazing sales going on. 
But this is the start of it!
These balls and rosettes were all DIY and easy to do!